|
| Physics and Astronomy |
|
Back to top
On this page
Contents Mr TurtleMr Turtle (logo as he is formally called) is a well-known teaching tool. We will only be playing with him for this one week. So make the most of him! Unlike most turtles Mr Turtle can obey simple commands and even draw lines with a multi-colured pen, so we can use him to create interesting patterns. For this week only we suggest you work in pairs. Do not print out this page: work from the web as there are some examples to copy and paste. Before we start it's worth noting that Mr Turtle has his own rather unique language and syntax (he's a turtle after all) and we won't be using all his capabilities. It's the discussions you will have with your partner that will be the most useful part of today's exercise so don't get too worried about the details of how you do things: concentrate on the principles. For some of the tasks we will tell you what to do and ask you to work out what will happen when you do it. If what happens isn't what you expected, try to work out why it did happen. Other tasks will ask you to combine aspects of two of the previous tasks to do something new. This is a whole week's practical work so expect it to take over an hour. Load the logo web appMake the window with the turtle in quite big. Controlling the turtleCommands are entered in the box at the bottom of the page ("Type your code here") and executed when you hit the "Run" button. Pressing "Run" runs the entire contents of the command box so you will normally need to delete the previous command before typing in the next (Ctrl-A Backspace). NB: clicking the small upward arrow at the top right of the input box changes it ito a multi-line box which is probaby more convenient. Command historyThe app keeps a record of all the commands you have run which can be seen from the "History" link towards the top right of the page. Clicking inside the body of the command copies it into the command window where it can be edited if necessary and then and rerun. Some useful commandsThe more common commands have two-letter shortcuts.
For example, copy either of the following into the (multi-line) control window and press Run
Just for fun: changing the pen colorNone of the exercises require you to change the pen color but it's fun anyway!
setpencolor "black     setpencolor "blue
setpencolor "lime      setpencolor "cyan
setpencolor "red       setpencolor "magenta
setpencolor "yellow    setpencolor "brown
setpencolor "tan       setpencolor "green
setpencolor "aqua      setpencolor "salmon
setpencolor "purple    setpencolor "orange
setpencolor "gray      setpencolor "white
Play around a bit to get the idea, then move to task 1. (It's worth noticing that Mr Turtle doesn't care too much about new lines: we can put two commands onto one line or split a single command over several lines as we wish.) 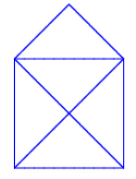 Task 1: Drawing a houseDraw the classic line-drawing of a house (a square with the two diagonals and a roof) without going over any line twice. We suggest drawing it by hand first to check the right way to do it. Discuss
Task 2: Teaching Mr Turtle a new trickUnsurprisingly Mr Turtle does not know what a triangle is:
A procedure is just a fancy name for a command we can teach Mr Turtle, in the same was that we might teach a dog to sit and beg. The following code (there is no need to type it in if you don't want to) would draw a triangle:
Teaching Mr Turtle the meaning of the word triangle
Possibly confusing Mr Trurtle?
Task 3: Teaching Mr Turtle to draw a housePreviously we have created a sequence of commands to draw a house and then defined a new, single command to draw a triangle. Now we will combine these two concepts together to create a new command to draw a house.
Try it out! Task 4: A polygonIn the triangle example above we drew a triangle simply by typing in "fd ... lt" three times. Here we see another, more flexible approach. Discuss
make "SIDES  6
repeat :SIDES [ fd 400/:SIDES    lt 360/:SIDES ]
"
Hints: the somewhat strange syntax :SIDES means "the value of SIDES", and don't forget the double quote on the first line. Questions to discuss with your partner
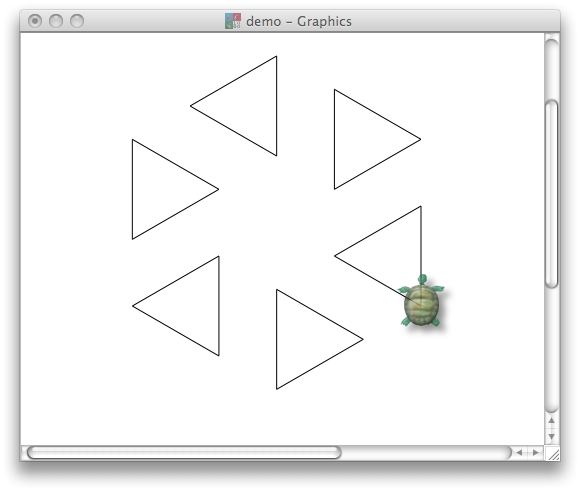
Task 5: A more-complicated pattern
Modify the above code snippet to draw a regular hexagon of triangles, i.e. six triangles such that their centres form a regular hexagon as shown above. (Do not modify the "triangle" function, rather use it unchanged inside the previous code snippet.
Your first attempt will have an irritating flaw. The commands "penup" and "pendown" may help here. Try making a pentagon of triangles, octagon of triangles, etc. Task 6: Teaching Mr Turtle to draw polygonsSo far we have taught Mr Turtle what to do on the command "triangle" (unsurprisingly, it's to draw a triangle) and created a sequence of commands to draw an arbitrary polygon. We can combine this "triangle" procedure and the polygon loop in a rather neat way. to polygon :SIDES repeat :SIDES [ fd 400/:SIDES lt 360/:SIDES ] end This looks pretty much like what we have seen before except that:
The effect of these two changes is that the polygon command expects the value of SIDES to be provided to it, in exactly the same way as fd 100 tells the fd command to move forward 100 pixels, not 50. Click "Run".
polygon 3and pressed "Run"? How about: polygon 6 Try it. Task 7: A scalable houseIn the example above we passed the procedure a parameter, which we chose to call "SIDES". Then inside the body of the procedure we were able to use ":SIDES" (don't forget the colon) inside arithmetic expressions which was then equal to the value we passed to it from the main command line. Modify your "house" procedure to take an argument which is the side of the main square so that you can can type in "house 100 ", "house 200" etc. (or whatever you chose to call your procedure) to draw houses of different sizes. Task 8: Lots of polygons.In the command line create a procedure polypolygon (or make up your own name).
to polypolygon :POLYS :SIDES
pendown
repeat :POLYS [ polygon(:SIDES) penup
                fd 1200/:POLYS lt 360/:POLYS pendown
              ]
end
Functions can call other functions. Hit "Run" and try it, eg polypolygon 6 6 . Task 8a: centre itThe previous function draws the polypolygon to the left of the center. Try adding a command to the start of the polypolygon function to move the turtle to the right before drawing:
to polypolygon :POLYS :SIDES
pendown
repeat :POLYS [ polygon(:SIDES) penup
                fd 1200/:POLYS lt 360/:POLYS pendown
              ]
end
Task 9: Lots of houses!Now create a new procedure, based on the previous one, to draw a "polygon of houses", i.e. exactly the same as task 8 but houses instead of polygons. The two parameters should be the number of houses and their size. Do not worry about whether they are vertical or not. Task 10: Discuss:
|