| School of Physics |
|
| Physics Home | Study here | Our Teaching | Our Research | Our Centres | News | Work here | EMPS |
Back to top
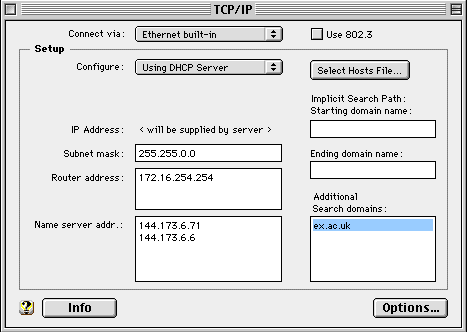
Classic System SoftwareContinued from: Introduction There should be an application called Apple System Profiler installed somewhere on your Mac, use "Find..." to look for it. Apple System Profiler can be downloaded from http://www.info.apple.com/support/downloads.html. It can be installed on versions greater than Mac OS 7.6 running on PowerPC. Run it, and on the "System Overview" tab there is a "network overview" and under this there is an "Appletalk" section and in this you will find the hardware address, it will probably be something like 00.30.nn.nn.nn.nn Make a careful note of the above numbers and use the online registration form to activate your outlet. Once the Mac is physically connected to the activated outlet go to the AppleTalk control panel and choose the option to "Connect via built-in ethernet" Next you need to setup the TCP/IP control panel. Open it and then select "User mode..." from the Edit menu. Select the "Basic User" button on the dialogue box that appears, then click Okay. Exactly which fields will still need to be completed depend on which version of the MacOS software you have installed. If there is a field for "DHCP Client ID" leave it blank. The most recent versions of the MacOS can automatically get all the necessary information from the DHCP server. Click the "Options..." button and select "Make TCP/IP: Active" and don't have the "Load only when needed" box ticked (otherwise the delays will drive you mad). Click Okay and then close the TCP/IP control panel, thereby updating the settings. Next, open it again and click the "Info" button. There should be a number like 172.16.nnn.nnn labeled "This Macintosh:" or "IP address:" which is the TCP/IP address that has been allocated for your session. The settings should be equivalent to
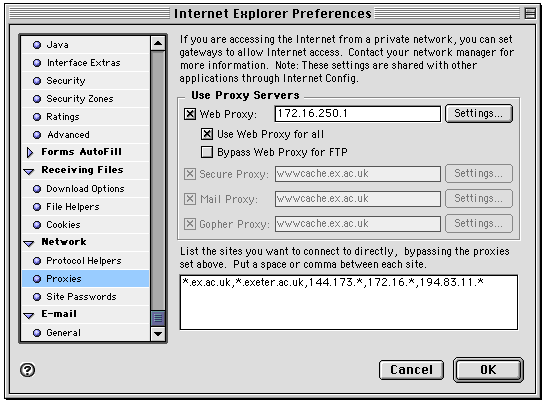
Classic Application SoftwareInternet applications normally share common settings by using the Internet Config database. Email ClientsMost students will want easy access email from several locations and will therefore choose the Exeter WebMail service. Eudora is the industrial-strength email client but is non-trivial to set-up for multiple-location use. Web BrowsersThere are three significant browsers for the Macintosh: Netscape, Internet Explorer, and iCab.Nestcape and iCab can autoconfigure their proxy settings once you've told them to use http://www.ex.ac.uk/resnet.pac as the automatic configuration script. Internet Explorer needs to be set up manually. For the proxy try, in order of preference:
and start with the list of machines to access directly empty. You should be able to access machines outside Exeter (try http://www.bbc.com/ ) but machines inside ( try http://newton.ex.ac.uk/ ) will fail with a complaint from the proxy that it doesn't do local machines. Now add the local machines that you want to access to the list. Use a comma as a separator rumour has it that some combiniations of software don't recognise spaces.
You can use the Settings button to specify port 8080 for the proxy server, but it doesn't seem to matter if you don't. See also: Instructions for MacOS X |

